Taking measurements is tricky business. Though one of our obligation-free services is taking them for you, some prefer to take measurements on their own. If you’re one of those people with supplies at your disposal but you don’t know where to begin; we’ve written up a step by step guide to take you through what needs to be done to take the most accurate measurements possible.
Step One — Gather Supplies
You technically can use a yard stick or a sewing tape to take measurements, but you definitely shouldn’t. Using these things can leave a wide margin for error which will affect the estimate we provide for you. The ideal tool for measuring is a retractable, metal carpenter measuring tape or a laser measurer. If there are any walls in your home with strange angles, it may even help to have a protractor, but that isn’t necessary.
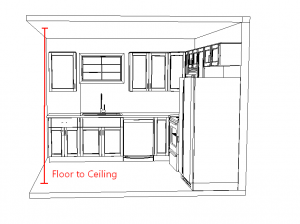
Step Two — Ceiling height
If you have cathedral ceilings, you don’t really need to worry about this step because you can have any height upper cabinet you want. Otherwise, though, you’re going to need to measure the space from the floor to the ceiling so that we can determine how big your upper cabinets can be. If you have a soffit or a drop down, also measure from the ceiling to the bottom of it and take down that measurement.
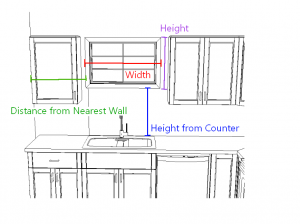
Step Three — Obstacles
A lot of kitchens have things like windows, pass throughs, doors, or walk throughs, which break up the cabinetry. For doors and walk throughs; measure the width, height, and how much space there is between the door and the adjacent wall(s). Pass throughs and windows follow the same rule of thumb, though you should also measure how far up they are from the counter top.
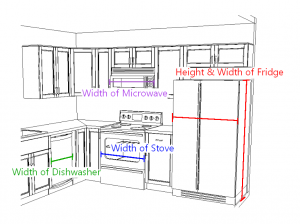
Step Four — Appliances
Most appliances come in standard sizes and we can make a pretty good guess as to what you have in your kitchen. However, there are some exceptions—especially in condos—so it doesn’t hurt to take measurements. Measure the width and height of your fridge, and the width of your dish washer, cooktop, range, and/or oven. If you have an under-cabinet microwave, the width and height of that will be helpful as well.
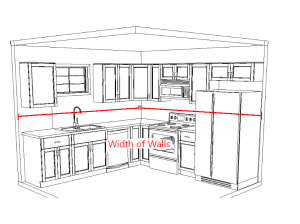
Step Five — Walls
The width of the walls is the most important measurement to have. Place the end of your tape at the end of a wall, and measure as much as you can before you get to an obstacle like a fridge or cabinet. Measure the width of that obstacle and then measure the wall from the obstacle on. If your walls are inaccessible or difficult for you to get to, you can also measure the front of your upper cabinets to get an accurate measurement. Do this for all of the usable walls in your kitchen.
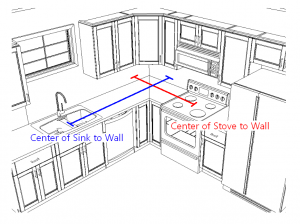
Step Six — Other Measurements
Other measurements that can make or break a design include; From the center of the stove to the nearest wall, and from the center of the sink to the nearest wall. It also helps to mark down where the pipe for the plumping is, and what direction it’s coming from.
Don’t
Waste your time — You don’t need to measure every single door and drawer you have. Save yourself a lot of work by not measuring the height or depth of the base cabinets, or every drawer you have; partially because some of these measurements are just standard sizes, and partially because you’re coming to us for new cabinets! We aren’t going to replicate your preexisting cabinetry, we’re going to fill the space with new cabinets.
In Conclusion
Okay, there’s a lot of information here, but if you’re truly interested in taking your own measurements, these tips and tricks are to be crucial to getting them as accurate as possible. At Luxurable Kitchen & Bath, we like to create designs that best utilizes the space while still maintaining its style, and accurate measurements are key to this process. Of course, if you’ve decided this is best left to the professionals, call us at (727) 286-8943 or stop on in to one of our two locations schedule an appointment today!
Recent Comments